Web UI Plugins
Dicoogle web user interface plugins, or just web plugins, are frontend-oriented pluggable components that live in the web application. The first section of this page is a tutorial that will guide you into making your first Dicoogle web plugin: a settings component for reading and modifying the DICOM server’s AE title. The second section will provide additional details about integrating web plugins and the APIs made available to them.
On web UI plugin support
The Dicoogle web UI plugin architecture is currently not fully covered by the Dicoogle project's stability guarantees. More kinds of web plugins are planned, but not fully supported. Features known to work well with the latest stable release of Dicoogle will be documented here in the Learning Pack. When working with development versions, the README pages in the webcore sub-project will be more up-to-date with changes in web plugin support.
Setting up a project
We will start by creating a Dicoogle web plugin project. Before we start, we must fulfill the following requirements:
- Node.js (LTS or Stable) ─ required for executing the building tools.
- npm (at least version 2 required, 3 is recommended) ─ the JavaScript package manager.
Now, we will install two packages globally, using the following command:
npm install -g yo generator-dicoogle-webplugin
Installing packages globally might not work immediately.
On Unix systems, you may need to fix the npm permissions. Although it is not recommended, you can also execute the command as super user (with sudo).
This will install the packages yo and generator-dicoogle-webplugin. The first one is the executable for Yeoman, a project scaffolding application with a generator ecosystem. The second one is a Dicoogle web plugin project generator, developed specifically to facilitate the development of this kind of plugins.
While still on a command line, execute the following commands:
mkdir webplugin-aetitle
cd webplugin-aetitle
yo dicoogle-webplugin
The application will now be asking you a series of questions about the project.
- The project name will be the name of the npm project, and also the unique name of the plugin. We can leave the default by pressing Enter.
- The description is just a small text about the plugin, and is completely optional.
- Next you will be asked about the type of web plugin. For this example, we will select the settings type.
- Afterwards, you may select whether you want a JavaScript or a TypeScript project. A JavaScript project will include Babel to guarantee the existence of features that were standardized in ECMAScript 2015 and ECMAScript 2016. A TypeScript project will be configured to use a TypeScript compiler instead. Any of the two kinds of projects should work fine, but you might prefer the JavaScript project if you don’t know anything about TypeScript. On the other hand, a TypeScript project will provide you better IDE integration with static type checking and auto-complete facilities.
- The caption is a label that is shown in the web application. We will set this one to “AE Title”.
- Finally, you are requested additional information about the project, which can be added in case of the project being put into a public repository. They are all optional.
After the process is complete, you will have a brand new project in your working directory.
Building and installing
Before we make the necessary changes, let us see whether the created web plugin works. First we build the project:
npm install
This will yield, among others, a file named “module.js”. This one and “package.json” make the full plugin.
We will now install this plugin as a standalone web plugin. Create a folder “WebPlugins” in your “DicoogleDir” folder. Afterwards, create a directory “aetitle” in “WebPlugins” and copy the two files above into this folder. The directory tree should look like this:
 DicoogleDir
 ├── Plugins
 |   └── ...
 ├── WebPlugins
 |   └── aetitle
 |       ├── package.json
 |       └── module.js
 ├── storage
 |   └── ...
 ├── ...
 └── dicoogle.jar
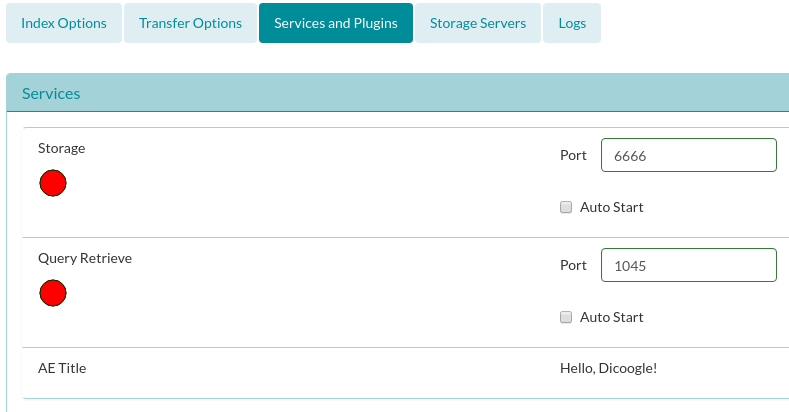
Start Dicoogle and enter the web application, into the Management menu. The Services & Plugins sub-menu should now have our plugin.
Dicoogle web plugins are currently an experimental feature.
Although these plugins are known to work for a variety of use cases, some of the features may be unstable or have bugs. If the web plugin does not appear, consider logging out of Dicoogle and logging back in. Refreshing the page may also help. Furthermore, it is often worth checking the server log for the list of plugins that were loaded.
Once we know that it works, it’s time to head back to our aetitle project.
Implementing an AE Title configurator
At this point, we now want to implement the intended functionality. The plugin should show a text box to see and modify the server’s AE Title. The main question that arises would be: Where do I implement that? Let’s have a look at the generated source code in “src/index.js”.
/* global Dicoogle */

export default class MyPlugin {

    constructor() {
        // TODO initialize plugin here
    }

    /**
     * @param {DOMElement} parent
     * @param {DOMElement} slot
     */
    render(parent, slot) {
        // TODO mount a new web component here
        const div = document.createElement('div');
        div.innerHTML = 'Hello, Dicoogle!';
        parent.appendChild(div);
    }
}
There may be many parts that are not quite understandable here, but the essentials are:
- The whole plugin is represented as a class, and this is the module’s default export. Typically, you do not have to touch this.
- The constructor can be used to initialize certain parts of the plugin before any rendering takes place. It is not always needed.
- The `render’ method is the most important portion of the plugin: it is where new HTML elements are created and written to the web app’s document. The example shows how this can be done with the standard Document Object Model (DOM) Web API.
- In order to develop plugins safely, the elements should be attached as children to the
parentelement.
Instead of creating a div, we will create a text box and a label to provide feedback to the user.
render(parent, slot) {
    // create text input
    const txtAetitle = document.createElement('input');
    this.txtAetitle = txtAetitle;
    txtAetitle.type = 'text';
    txtAetitle.className = 'form-control';
    txtAetitle.disabled = true;
    parent.appendChild(txtAetitle);

    // create feedback label
    this.lblFeedback = document.createElement('span');
    parent.appendChild(this.lblFeedback);

}
A new question should arise here: How to we interact with Dicoogle from here?
Interacting with Dicoogle
Interfacing with the Dicoogle instance is done through the Dicoogle client API, in the dicoogle-client package.
The package can be included in separate applications, but when developing web plugins, we don’t have to. Instead, a global variable Dicoogle is exposed with all of the features. The operations available are all listed in the Dicoogle Client documentation. In particular, we are looking for two methods:
Dicoogle.getAETitle(fn)─ to retrieve the AE title currently set on the archive.Dicoogle.setAETitle(aetitle, fn)─ to set the title of the archive’s AE.
With a bit of client-side programming, one may come up with something like this:
render(parent, slot) {
    // create text input
    const txtAetitle = document.createElement('input');
    txtAetitle.type = 'text';
    txtAetitle.className = 'form-control';
    txtAetitle.style = `
        display: inline-block;
        width: 16em;
        margin-right: 1em;
    `;
    txtAetitle.disabled = true;
    parent.appendChild(txtAetitle);

    // create feedback label
    const lblFeedback = document.createElement('span');
    parent.appendChild(lblFeedback);

    // request for the current AE title
    Dicoogle.getAETitle((err, aetitle) => {
        if (err) {
            console.error("Service failure", err);
            return;
        }
        // put value in text box and make it editable
        txtAetitle.value = aetitle;
        txtAetitle.disabled = false;

        // add a handle to pressing the enter key
        txtAetitle.addEventListener('keyup', function(event) {
            event.preventDefault();
            if (event.keyCode == 13) {
                // handle submitting a new AE title
                const aetitle = txtAetitle.value;
                lblFeedback.innerText = "...";
                Dicoogle.setAETitle(aetitle, (err) => {
                    if (err) {
                        console.error("Service failure", err);
                        lblFeedback.innerText = "Service failed";
                        return;
                    }
                    lblFeedback.innerText = "\u2714";
                    // make tick mark disappear after a small while
                    setTimeout(() => {
                        lblFeedback.innerText = "";
                    }, 700);
                });
            }
        });
    });
}
Let’s repeat the installation process by running npm install and copying the updated “module.js” file to the deployment folder. We may now enter the web application again and see that the changes have taken effect.

Web plugins are cached by the browser!
If you find that the plugins are not being updated properly, you may have to temporarily disable caching in your browser. This shouldn't come up as an issue in production, since web plugins do not change frequently.
Further information
The rest of this page contains further details about Dicoogle web plugins and how they work.
Dicoogle Webcore
The Dicoogle webcore is one of the components of the webapp that serves as a backbone to web UI plugins. The essence of this architecture is that Dicoogle web pages will contain stub slots where plugins can be attached to. The webcore implements this logic, and the source code can be found here.
Plugin descriptor
A descriptor takes the form of a “package.json”, an npm package descriptor, containing at least these attributes:
name: the unique name of the plugin (must be compliant with npm)version: the version of the plugin (must be compliant with npm)description(optional) : a simple, one-line description of the packagedicoogle: an object containing Dicoogle-specific information:caption(optional, defaults to name) : an appropriate title for being shown as a tab (or similar) on the web pageslot-id: the unique ID of the slot where this plugin is meant to be attachedmodule-file(optional, defaults to “module.js”) : the name of the file containing the JavaScript module
In addition, these attributes are recommended:
author: the author of the plugintags: the tags “dicoogle” and “dicoogle-plugin” are recommendedprivate: if you do not intend to publish the plugin into an npm repository, set this totrue.
An example of a valid “package.json”:
{
  "name" : "dicoogle-cbir-query",
  "version" : "0.0.1",
  "description" : "CBIR Query-By-Example plugin",
  "author": "John Doe <jdoe@somewhere.net>",
  "tags": ["dicoogle", "dicoogle-plugin"],
  "dicoogle" : {
    "caption" : "Query by Example",
    "slot-id" : "query",
    "module-file" : "module.js"
  }
}
Module
In addition, a JavaScript module must be implemented, containing the entire logic and rendering of the plugin. The final module script must be exported in CommonJS format (similar to the Node.js module standard), or using the standard ECMAScript default export, when transpiled with Babel. The developer may also choose to create the module under the UMD format, although this is not required. The developer can make multiple node-flavored CommonJS modules and use tools like browserify to bundle them and embed dependencies. Some of those however, can be required without embedding. In particular, some modules such as “react”, “react-dom”, and “dicoogle-client” can be imported externally, and so must be marked as external dependencies.
The exported module must be a single constructor function (or class), in which instances must have a render(parent, slot) method:
/** Render and attach the contents of a new plugin instance to the given DOM element.
 * @param {DOMElement} parent the parent element of the plugin component
 * @param {DOMElement} slot the DOM element of the Dicoogle slot
 * @return Alternatively, return a React element while leaving `parent` intact. (Experimental, still unstable!)
 */
function render(parent, slot) {
    // ...
}
On support for React components
The latest version allows users to render React elements by returning them from the render method instead of attaching
bare DOM elements to the parent div. However, this feature is unstable and known not to work very well. Future versions
may allow a smooth approach to developing web plugins in a pure React environment. In the mean time, it is possible to
use React by calling render directly on parent.
Furthermore, the onResult method must be implemented if the plugin is for a “result” slot:
/** Handle result retrieval here by rendering them.
 * @param {object} results an object containing the results retrieved from Dicoogle's search service
 */
function onResult(results) {
    // ...
}
All modules will have access to the Dicoogle plugin-local alias for interfacing with Dicoogle.
Query plugins can invoke issueQuery(...) to perform a query and expose the results on the page (via result plugins).
Other REST services exposed by Dicoogle are easily accessible with request(...).
See the Dicoogle JavaScript client package and the Dicoogle
Web API section below for a more thorough documentation.
Modules are meant to work independently, but can have embedded libraries if so is desired. In addition, if the underlying web page is known to contain specific libraries, then these can also be used without being embedded. This is particularly useful to avoid replicating dependencies and prevent modules from being too large.
Below is an example of a plugin module.
module.exports = function() {

  // ...

  this.render = function(parent, slot) {
    var e = document.create('span');
    e.innerHTML = 'Hello Dicoogle!';
    parent.appendChild(e);
  };
};
Exporting a class in ECMAScript 6 also works (since classes are syntatic sugar for ES5 constructors). The code below can be converted to ES5 using Babel:
export default class MyPluginModule() {

  render(parent) {
    let e = document.create('span');
    e.innerHTML = 'Hello Dicoogle!';
    parent.appendChild(e);
  }
};
Types of Web Plugins
As previously mentioned, we are requested to specify a a type of plugin, often with the “slot-id” property. This type defines how webplugins are attached to the application. The following Note that not all of them are fully supported at the moment.
- menu: Menu plugins are used to augment the main menu. A new entry is added to the side bar (named by the plugin’s caption property), and the component is created when the user navigates to that entry.
- result-option: Result option plugins are used to provide advanced operations to a result entry. If the user activates “Advanced Options” in the search results view, these plugins will be attached into a new column, one for each visible result entry.
- result-batch: Result batch plugins are used to provide advanced operations over an existing list of results. These plugins will attach a button (named with the plugin’s caption property), which will pop-up a division below the search result view.
- settings: Settings plugins can be used to provide addition management information and control. These plugins will be attached to the “Plugins & Services” tab in the Management menu.
Dicoogle Web API
Either require the dicoogle-client module (if the page supports the operation) or use the alias Dicoogle to
access and perform operations on Dicoogle and the page’s web core. All methods described in
dicoogle-client are available. Furthermore, the web
core injects the following methods:
issueQuery : function(query, options, callback)
Issue a query to the system. This operation is asynchronous and will automatically issue back a result exposal to the page’s result module. The query service requested will be “search” unless modified with the overrideService option.
- query an object or string containing the query to perform
- options an object containing additional options (such as query plugins to use, result limit, etc.)
- [overrideService] {string} the name of the service to use instead of “search”
- callback an optional callback function(error, result)
addEventListener : function(eventName, fn)
Add an event listener to an event triggered by the web core.
- eventName : the name of the event (can be one of ‘load’,’menu’ or a custom one)
- fn : a callback function (arguments vary) –
function(...)
addResultListener : function(fn)
Add a listener to the ‘result’ event, triggered when a query result is obtained.
- fn :
function(result, requestTime, options)
addPluginLoadListener : function(fn)
Add a listener to the ‘load’ event, triggered when a plugin is loaded.
- fn :
function(Object{name, slotId, caption})
addMenuPluginListener : function(fn)
Add a listener to the ‘menu’ event, triggered when a menu plugin descriptor is retrieved. This may be useful for a web page to react to retrievals by automatically adding menu entries.
- fn :
function(Object{name, slotId, caption})
emit: function(eventName, ...args)
Emit an event through the webcore’s event emitter.
- eventName : the name of the event
- args : variable list of arguments to be passed to the listeners
emitSlotSignal: function(slotDOM, eventName, data)
Emit a DOM custom event from the slot element.
- slotDOM : the slot DOM element to emit the event from
- name : the event name
- data : the data to be transmitted as custom event detail
Webcore Events
Full list of events that can be used by plugins and the webapp. (Work in Progress)
- “load” : Emitted when a plugin package is retrieved.
- “result” : Emitted when a list of search results is obtained from the search interface.
Further details about web UI plugins may be obtained in the webcore project.